Power apps required powerfx Formula
https://learn.microsoft.com/en-us/power-platform/power-fx/reference/function-table-shaping
Add Columns:
The Add Columns function adds a column to a table, and a formula defines the values in that column. Existing columns remain unmodified.
The formula is evaluated for each record of the table.
Syntax: AddColumns( Table Name, Column, Formula )
Add a second Button control, set its OnSelect property to this formula, and then run it:
Example: ClearCollect(
FirstExample, AddColumns
(IceCreamSales, Revenue , UnitPrice*QuantitySold)
)
And, Or, Not:
The And function returns true if all of its arguments are true.
The Or function returns true if any of its arguments are true.
The Not function returns true if its argument is false; it returns false if its argument is true.
These functions work the same way as they do in Excel. You can also use operators to perform these same operations, using either Visual Basic or JavaScript syntax:
| Function notation | Visual Basic operator notation | JavaScript operator notation |
|---|---|---|
| And( x, y ) | x And y | x && y |
| Or( x, y ) | x Or y | x || y |
| Not( x ) | Not x | ! x |
IsType
This function tests whether a record reference refers to a specific table type. The function returns a Boolean TRUE or FALSE.
AsType
This function treats a record reference as a specific table type, sometimes referred to as casting. You can use the result as if it were a record of the table and again use the Record. Field notation to access all of the fields of that record. An error occurs if the reference isn't of the specific type.
Use these functions together to first test the table type of a record and then treat it as a record of that type so that the fields are available:
If the record reference is blank, IsType returns FALSE, and AsType returns blank. All fields of a blank record will be blank.
Syntax
AsType( RecordReference, TableType )
- RecordReference - Required. A record reference, often a lookup field that can refer to a record in any of multiple tables.
- TableType - Required. The specific table to which the record should be cast.
IsType( RecordReference, TableType )
- RecordReference - Required. A record reference, often a lookup field that can refer to a record in any of multiple tables.
- TableType - Required. The specific table for which to test.
If( IsType( First( Accounts ).Owner, Users ),
AsType( First( Accounts ).Owner, Users ).'Full Name',
AsType( First( Accounts ).Owner, Teams ).'Team Name'
)
Average
Average is a function calculates the average, or arithmetic mean, of its arguments.
The Max function finds the maximum value.
The Min function finds the minimum value.
The Sum function calculates the sum of its arguments.
The StdevP function calculates the standard deviation of its arguments.
The VarP function calculates the variance of its arguments.
You can supply the values for these functions as:
- Separate arguments. For example, Sum( 1, 2, 3 ) returns 6.
- A table and a formula to operate over that table. The aggregate will be calculated on the values of the formula for each record.
Average(Slider1.Value, Slider2.Value, Slider3.Value): The label would show the average of all values to which the sliders were set.
Max(Slider1.Value, Slider2.Value, Slider3.Value): The label would show the maximum of all values to which the sliders were set.
Min(Slider1.Value, Slider2.Value, Slider3.Value): The label would show the minimum of all values to which the sliders were set.
StdevP(Slider1.Value, Slider2.Value, Slider3.Value): The label would show the standard deviation of all values to which the sliders were set.
VarP(Slider1.Value, Slider2.Value, Slider3.Value): The label would show the variance of all values to which the sliders were set.
Back
Applies to: ![]() Canvas apps
Canvas apps
The Back function returns to the screen that was most recently displayed.
For each Navigate call, the app tracks the screen that appeared and the transition. You can use successive Back calls to return all the way to the screen that appeared when the user started the app.
When the Back function runs, the inverse transition is used by default. For example, if a screen appeared through the CoverRight transition, Back uses UnCover (which is to the left) to return. Fade and None are their own inverses. Pass an optional argument to Back to force a specific transition.
Back normally returns true but returns false if the user hasn't navigated to another screen since starting the app.
Syntax
Back( [ Transition ] )
- Transition - Optional. The visual transition to use between the current screen and the previous screen. Refer to the list of valid values for this argument earlier in this article. By default, the transition through which a screen returns is the inverse of the transition through which it appeared.
- Back()
Navigate( Screen [, Transition [, UpdateContextRecord ] ] )
- Screen - Required. The screen to display. In place of Screen, you can also use a control that is on the screen you wish to navigate to.
- Transition - Optional. The visual transition to use between the current screen and the next screen. See the list of valid values for this argument earlier in this article. The default value is None.
- UpdateContextRecord - Optional. A record that contains the name of at least one column and a value for each column. This record updates the context variables of the new screen as if passed to the UpdateContext function.
- Navigate( Screen1, ScreenTransition.Cover )
Blank
The Blank function returns a blank value. Use this to store a NULL value in a data source that supports these values, effectively removing any value from the field.
IsBlank( Value )
The IsBlank function tests for a blank value or an empty string. The test includes empty strings to ease app creation since some data sources and controls use an empty string when there is no value present. To test specifically for a blank value use if( Value = Blank(), ... instead of IsBlank. The IsBlank function considers empty tables as not blank, and IsEmpty should be used to test a table.
When Enabling error handling for existing apps consider replacing IsBlank With IsBlankOrError to preserve existing app behavior. Prior to the addition of error handling, a blank value was used to represent both null values from databases and error values. Error handling separates these two interpretations of blank which could change the behavior of existing apps that continue to use IsBlank.
The return value for IsBlank is a boolean true or false.
- Value – Required. Value to test for a blank value or empty string.
- Example- IsBlank( First( Cities ).Weather )
IsBlankOrError
The IsBlankOrError function tests for either a blank value or an error value and is the equivalent of Or( IsBlank( X ), IsError( X ) ).
When enabling error handling for existing apps, consider replacing IsBlank with IsBlankOrError to preserve existing app behavior. Prior to the addition of error handling, a blank value was used to represent both null values from databases and error values. Error handling separates these two interpretations of blank which could change the behavior of existing apps that continue to use IsBlank.
The return value is a boolean true or false.
The IsEmpty function tests whether a table contains any records. It's equivalent to using the CountRows function and checking for zero. You can check for data-source errors by combining IsEmpty with the Errors function.
The return value for IsEmpty is a Boolean true or false.
IsEmpty( Table )
- Table - Required. Table to test for records.
Calendar:
The Calendar and Clock functions are a set of functions that retrieve information about the current locale.
You can use these functions to display dates and times in the language of the current user. The single-column tables returned by Calendar and Clock functions can be used directly with the Items property of Dropdown and Listbox controls.
| Function | Description |
|---|---|
| Calendar.MonthsLong() | Single-column table containing the full names of each month, starting with "January". |
| Calendar.MonthsShort() | Single-column table containing the abbreviated names of each month, starting with "Jan" for January. |
| Calendar.WeekdaysLong() | Single-column table containing the full names of each weekday, starting with "Sunday". |
| Calendar.WeekdaysShort() | Single-column table containing the full names of each weekday, starting with "Sun" for Sunday. |
| Clock.AmPm() | Single-column table containing the long uppercase "AM" and "PM" designations. If the language uses a 24-hour clock, the table will be empty. |
| Clock.AmPmShort() | Single-column table containing the short uppercase "A" and "P" designations. If the language uses a 24-hour clock, the table will be empty. |
| Clock.IsClock24() | Boolean indicating if a 24-hour clock is used in this locale. |
Use the Text function to format date and time values using this same information. The Language function returns the current language and region code.
Syntax
Calendar.MonthsLong()
Calendar.MonthsShort()
Calendar.WeekdaysLong()
Calendar.WeekdaysShort()
Clock.AmPm()
Clock.AmPmShort()
Clock.IsClock24()
Examples
Insert a Dropdown control.
Set the formula for the Items property to:
- Calendar.MonthsLong()
Users of your app can now select a month in their own language. MonthsLong can be replaced with any of the single-column tables that are returned by Calendar to create weekday and time selectors.
In the United States, with Language returning "en-US", the following is returned by the Calendar functions:
| Formula | Description | Result |
|---|---|---|
| Calendar.MonthsLong() | The return value contains the full name of each month, starting with "January". | [ "January", "February", "March", "April", "May", "June", "July", "August", "September", "October", "November", "December" ] |
| Calendar.MonthsShort() | The return value contains the abbreviated name of each month, starting with "January". | [ "Jan", "Feb", "Mar", "Apr", "May", "Jun", "Jul", "Aug", "Sep", "Oct", "Nov", "Dec" ] |
| Calendar.WeekdaysLong() | The return value contains the full name of each day, starting with "Sunday". | [ "Sunday", "Monday", "Tuesday", "Wednesday", "Thursday", "Friday", "Saturday" ] |
| Calendar.WeekdaysShort() | The return value contains the abbreviated name of each day, starting with "Sunday". | [ "Sun", "Mon", "Tue", "Wed", "Thu", "Fri", "Sat" ] |
| Clock.AmPm() | This language uses a 12-hour clock. The return value contains the uppercase versions of the full AM and PM designations. | [ "AM", "PM" ] |
| Clock.AmPmShort() | This language uses a 12-hour clock. The return value contains the uppercase versions of the short AM and PM designations. | [ "A", "P" ] |
| Clock.IsClock24() | This language uses a 12-hour clock. | false |
Choices
The Choices function returns a table of the possible values for a lookup column.
Use the Choices function to provide a list of choices for your user to select from. This function is commonly used with the Combo box control in edit forms.
For a lookup, the table that Choices returns matches the foreign table that's associated with the lookup. By using Choices, you eliminate the need to add the foreign table as an additional data source. Choices returns all columns of the foreign table.
Because Choices returns a table, you can use Filter, Sort, AddColumns, and all the other table-manipulation functions to filter, sort, and shape the table.
At this time, you can't delegate Choices. If this limitation poses a problem in your app, add the foreign table as a data source, and use it directly.
Choices doesn't require column names to be strings and enclosed in double quotes, unlike the ShowColumns, Search, and other table functions. Provide the formula as if you were referencing the column directly.
Column references must be direct to the data source. For example, if the data source is Accounts and the lookup is SLA, the column reference would be Accounts.SLA. The reference can't pass through a function, a variable, or a control. Furthering this example, if Accounts is fed to a Gallery control, use the formula Gallery.Selected.SLA to reference the SLA for the selected account. However, this reference has passed through a control, so it can't be passed to the Columns function - you must still use Accounts.SLA.
At this time, you can use lookup columns only with SharePoint and Microsoft Dataverse.
Syntax
Choices( column-reference [, text-filter ] )
- column-reference - Required. A lookup column of a data source. Don't enclose the column name in double quotes. The reference must be directly to the column of the data source and not pass through a function or a control.
- text-filter - Optional. Filters the list of choices by only returning choices that start with the text specified in text-filter. If an empty string is specified, all choices will be returned.
Collect, Clear, and ClearCollect functions
Collect
Applies to: ![]() Canvas apps
Canvas apps ![]() Cards
Cards ![]() Dataverse low-code plug-ins
Dataverse low-code plug-ins ![]() Power Platform CLI
Power Platform CLI ![]() Desktop flows
Desktop flows
The Collect function adds records to a data source. The items to be added can be:
- A single value: The value is placed in the Value field of a new record. All other properties are left blank.
- A record: Each named property is placed in the corresponding property of a new record. All other properties are left blank.
- A table: Each record of the table is added as a separate record of the data source as described above. The table isn't added as a nested table to a record. To do this, wrap the table in a record first.
When used with a collection, additional columns will be created as needed. The columns for other data sources are fixed by the data source and new columns can't be added.
If the data source doesn't already exist, a collection is created.
Collections are sometimes used to hold global variables or make a temporary copy of a data source. Canvas apps are based on formulas that automatically recalculate as the user interacts with an app. Collections don't enjoy this benefit and their use can make your app harder to create and understand. Before using a collection in this manner, review working with variables.
You can also use the Patch function to create records in a data source.
Collect returns the modified data source as a table. Collect can only be used in a behavior formula.
Clear
Applies to: ![]() Canvas apps
Canvas apps
The Clear function deletes all the records of a collection. The columns of the collection will remain.
Note that Clear only operates on collections and not other data sources. You can use RemoveIf( DataSource, true ) for this purpose. Use caution as this will remove all records from the data source's storage and can affect other users.
You can use the Remove function to selectively remove records.
Clear has no return value. It can only be used in a behavior formula.
ClearCollect
Applies to: ![]() Canvas apps
Canvas apps ![]() Model-driven apps
Model-driven apps
The ClearCollect function deletes all the records from a collection. And then adds a different set of records to the same collection. With a single function, ClearCollect offers the combination of Clear and then Collect.
ClearCollect returns the modified collection as a table. ClearCollect can only be used in a behavior formula.
Delegation
When used with a data source, these functions can't be delegated. Only the first portion of the data source will be retrieved and then the function applied. The result may not represent the complete story. A warning may appear at authoring time to remind you of this limitation and to suggest switching to delegable alternatives where possible. For more information, see the delegation overview.
Syntax
Collect( DataSource, Item, ... )
- DataSource – Required. The data source that you want to add data to. If it doesn't already exist, a new collection is created.
- Item(s) - Required. One or more records or tables to add to the data source.
Clear( Collection )
- Collection – Required. The collection that you want to clear.
ClearCollect( Collection, Item, ... )
- Collection – Required. The collection that you want to clear and then add data to.
- Item(s) - Required. One or more records or tables to add to the data source.
Examples
Clearing and adding records to a data source
In these examples, you'll erase and add to a collection that's named IceCream. The data source begins with these contents:

| Formula | Description | Result |
|---|---|---|
| ClearCollect( IceCream, { Flavor: "Strawberry", Quantity: 300 } ) | Clears all data from the IceCream collection and then adds a record that includes a quantity of strawberry ice cream. |  The IceCream collection has also been modified. |
| Collect( IceCream, { Flavor: "Pistachio", Quantity: 40 }, { Flavor: "Orange", Quantity: 200 } ) | Adds two records to the IceCream collection that includes a quantity of pistachio and orange ice cream. |  The IceCream collection has also been modified. |
| Clear( IceCream ) | Removes all records from the IceCream collection. |  The IceCream collection has also been modified. |
For step-by-step examples of how to create a collection, see Create and update a collection.
Records and tables
These examples examine how record and table arguments to Collect and ClearCollect are handled.
| Formula | Description | Result |
|---|---|---|
| ClearCollect( IceCream, { Flavor: "Chocolate", Quantity: 100 }, { Flavor: "Vanilla", Quantity: 200 } ) | Clear all data and then adds two records to the IceCream collection that includes a quantity of chocolate and vanilla ice cream. The records to be added are provided as individual arguments to the function. | The IceCream collection has also been modified. |
| ClearCollect( IceCream, Table( { Flavor: "Chocolate", Quantity: 100 }, { Flavor: "Vanilla", Quantity: 200 } ) ) | Same as the previous example except that the records are combined in a table and passed in through a single argument. The contents of the table are extracted record by record before being added to the IceCream collection. | The IceCream collection has also been modified. |
| ClearCollect( IceCream, { MyFavorites: Table( { Flavor: "Chocolate", Quantity: 100 }, { Flavor: "Vanilla", Quantity: 200 } ) } ) | Same as the previous example except that the table is wrapped in a record. The records of the table aren't extracted and instead the entire table is added as a cell of the record. | 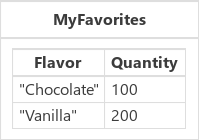 The IceCream collection has also been modified. |
Color:
Color enumeration, you can easily access the colors that are defined by HTML's Cascading Style Sheets (CSS). For example, Color.Red returns pure red. You can find a list of these colors at the end of this topic.
ColorValue:
The ColorValue function returns a color based on a color string in a CSS. The string can take any of these forms:
- CSS color name: "RoxyBrown" and "OliveDrab" are examples. These names don't include spaces. The list of supported colors appears later in this topic.
- 6-digit hex value: As an example "#ffd700" is the same as "Gold". The string is in the format "#rrggbb" where rr is the red portion in two hexadecimal digits, gg is the green, and bb is the blue.
- 8-digit hex value: As an example, "#ff7f5080" is the same as "Coral" with a 50% alpha channel. The string is in the format "#rrggbbaa" where rr, gg, and bb are identical to the 6-digit form. The alpha channel is represented by aa: 00 represents fully transparent, and ff represents fully opaque.
The RGBA function returns a color based on red, green, and blue components. The function also includes an alpha channel for mixing colors of controls that are layered in front of one another. An alpha channel varies from 0 or 0% (which is fully transparent and invisible) to 1 or 100% (which is fully opaque and completely blocks out any layers behind a control).
ColorFade:
The ColorFade function returns a brighter or darker version of a color. The amount of fade varies from -1 (which fully darkens a color to black) to 0 (which doesn't affect the color) to 1 (which fully brightens a color to white).
Description
These functions are often invoked from the OnSelect formula of a Button or Image control so that the user can save edits, abandon edits, or create a record. You can use controls and these functions together to create a complete solution.
These functions return no values.
You can use these functions only in behavior formulas.
Use the SubmitForm function in the OnSelect property of a Button control to save any changes in a Form control to the data source.
Before submitting any changes, this function checks for validation issues with any field that's marked as required or that has one or more constraints on its value. This behavior matches that of the Validate function.
SubmitForm also checks the Valid property of the Form, which is an aggregation of all the Valid properties of the Card controls that the Form control contains. If a problem occurs, the data isn't submitted, and the Error and ErrorKind properties of the Form control are set accordingly.
If validation passes, SubmitForm submits the change to the data source.
- If successful, the Form's OnSuccess behavior runs, and the Error and ErrorKind properties are cleared. If the form was in FormMode.New mode, it is returned to FormMode.Edit mode.
- If unsuccessful, the Form's OnFailure behavior runs, and the Error and ErrorKind properties are set accordingly. The mode of the form is unchanged.
EditForm
The EditForm function changes the Form control's mode to FormMode.Edit. In this mode, the contents of the Form control's Item property are used to populate the form. If the SubmitForm function runs when the form is in this mode, a record is changed, not created. FormMode.Edit is the default for the Form control.
Note
When the form is in edit mode and Item is null, data card properties are not evaluated and will return default values.
NewForm
The NewForm function changes the Form control's mode to FormMode.New. In this mode, the contents of the Form control's Item property are ignored, and the default values of the Form's DataSource property populate the form. If the SubmitForm function runs when the form is in this mode, a record is created, not changed.
ResetForm
The ResetForm function resets the contents of a form to their initial values, before the user made any changes. If the form is in FormMode.New mode, the form is reset to FormMode.Edit mode. The OnReset behavior of the form control also runs. You can also reset individual controls with the Reset function but only from within the form.
ViewForm
The ViewForm function changes the Form control's mode to FormMode.View. In this mode, the contents of the Form control's Item property are used to populate the form. The SubmitForm and ResetForm functions have no effect when in this mode.
DisplayMode Property
The current mode can be read through the Mode property. The mode also determines the value of the DisplayMode property, which can be used by data cards and controls within the form control. Often, the data card's DisplayMode property will be set to Parent.DisplayMode (referencing the form) as will the control's DisplayMode property (referencing the data card):
| Mode | DisplayMode | Description |
|---|---|---|
| FormMode.Edit | DisplayMode.Edit | Data cards and controls are editable, ready to accept changes to a record. |
| FormMode.New | DisplayMode.Edit | Data cards and controls are editable, ready to accept a new record. |
| FormMode.View | DisplayMode.View | Data cards and controls are not editable and optimized for viewing. |
Syntax
SubmitForm( FormName )
- FormName - Required. Form control to submit to the data source.
EditForm( FormName )
- FormName - Required. Form control to switch to FormMode.Edit mode.
NewForm( FormName )
- FormName - Required. Form control to switch to FormMode.New mode.
ResetForm( FormName )
- FormName - Required. Form control to reset to initial values. Also switches the form from FormMode.New mode to FormMode.Edit mode.
ViewForm( FormName )
- FormName - Required. Form control to switch to FormMode.View mode.
Examples
See Understand data forms for complete examples.
Add a Button control, set its Text property to show Save, and set its OnSelect property to this formula:
SubmitForm( EditForm )
Set the OnFailure property of a Form control to blank and its OnSuccess property to this formula:
Back()
Name a Label control ErrorText, and set its Text property to this formula:
EditForm.Error
When the user selects the Save button, any changes in the Form control are submitted to the underlying data source.
- If the submission succeeds, any changes are saved or, if the Form control is in New mode, a record is created. ErrorText is blank and the previous screen reappears.
- If the submission fails, ErrorText shows a user-friendly error message, and the current screen remains visible so that the user can correct the problem and try again.
Add a Button control, set its Text property to show Cancel, and set its OnSelect property to this formula:
ResetForm( EditForm ); Back()
When the user selects the Cancel button, the values in the Form control are reset to what they were before the user started to edit it, the previous screen reappears, and the Form control is returned to Edit mode if it was in New mode.
Add a Button control, set its Text property to show New, and set its OnSelect property to this formula:
NewForm( EditForm ); Navigate( EditScreen, None )
When the user selects the New button, the Form control switches to New mode, the default values for the Form control's data source populate that control, and the screen that contains the Form control appears. When the SubmitForm function runs, a record is created instead of updated.
Comments
Post a Comment